This article is also available in French from KolossalDrupal.com.
The extremely useful Node Import module has been around for over 4 years now - which is an eternity in Drupal-land - but in recent days other newer, shinier import modules have hit the scene. While these modules certainly are useful for many applications, sometimes the tried-and-true works just fine. In this article, I'm going to show you how to use the Node Import module to import data in CSV format (comma separated values) and map that content to existing content types that include node reference, text, and integer fields - including multi-select checkboxes.
It's easier than you think, and the hard work mainly occurs in tweaking your CSV files - almost always via a spreadsheet application. Once the files are good to go, the import process is almost trivial. I'm going to show you what you need to know to get your CSV files ready to be processed by the Node Import module and then how to complete the process from within Drupal.
The Task
Let's pretend you have a rock climbing web site where you want to be able to post a list of climbing areas and the routes available at each area. The data for the site has been provided to you in the form of a couple of CSV files - one for all the areas and one for all the routes. You're going to import the data into Drupal - here's the important part - while maintaining the relationship between the areas and routes.
CSV files
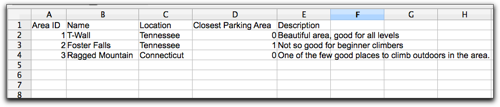
Taking a look at the two CSV files, you can see that they're related via an "Area ID" that is present in both files. Here's a look at the areas.csv file:
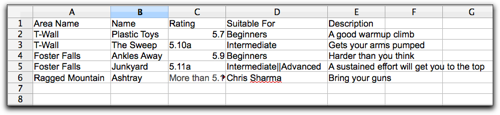
and here's a look at the routes.csv file:

It should be easy to see the relationship between the two files with the "Area ID" field as the key. Each area has a unique "Area ID" and each route has an "Area ID" that refers back to a specific area. So, the "Ankles Away" route, with an "Area ID" of 2 is part of the Foster Falls climbing area. So far so good.
The rest of the data in the files should be pretty self-explanatory with the exception of a few of fields. The "Closest Parking Area" column's values are actually milage values. A value of "0" doesn't actually mean "0 miles" though - it really means "less than a mile". We'll need to take this into account when setting up the content types in the next step.
The second "special case" is the route's "Suitable For" field. This field is actually a multi-select field - that is, it can be displayed as a multi-select list or a series of checkboxes where the content author can select more than one option. In the CSV file, multiple selections need to be separated with a double-pipe ("||").

The last, and perhaps most important special case in this example is the "Area ID" field. When we import this data into Drupal, we want to create a relationship between areas and routes using the a Node Reference field. In the Node Import module, this can be handled one of two ways:
- If your data file includes the referenced node's title, use the node reference select list widget.
- If your data file includes the referenced node's ID, then use the node reference autocomplete widget.
In my route data, I don't really have either the title or the Node ID. Be careful, don't assume that the "Area ID" is the same as a Node ID. If you're importing data into a completely empty Drupal site, then you might be able to get away with it, but if your site already has some content, then the imported areas will most definitely have Node IDs different than the Area IDs in the data file. It is for this reason that I prefer the first method - even if it does mean I need to tweak the "route" CSV file.
What you'll need to do is replace the "Area ID" field with the corresponding "Area Name" in the route CSV file. There are a number of ways to do this in virtually any spreadsheet program (manually, search/replace, macros, etc...) so I'm not going to go into any of those details. In the end, this is what your route CSV file should look like:
There's a helpful discussion on Drupal.org about importing data and node reference fields.
Many times, these "special cases" are where much of the work in "tweaking" the CSV files comes in.
Content Types
It should be fairly easy to see that this is going to require a couple of content types that are related to each other via the climbing area. I'm going to assume that you know how to set up related content types - check out this article for some background if you're not sure.
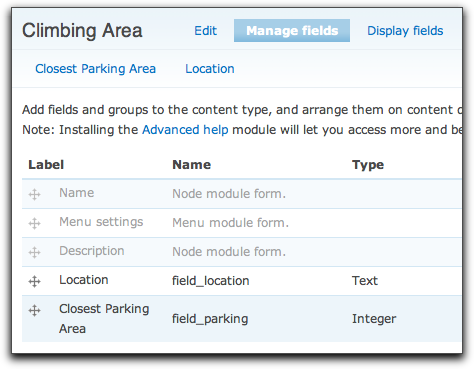
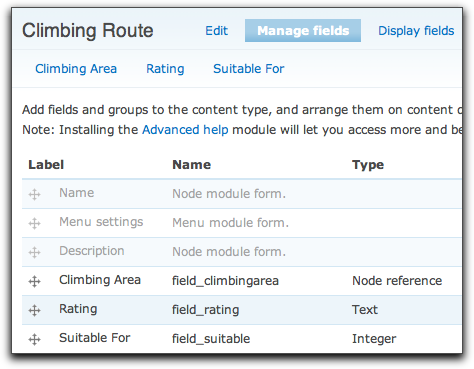
Anyway, here's a quick look at the content types you'll need:
I've included exports of these content types at the conclusion of this article.
When setting up your content types, there are a couple of tips you should keep in mind to make the import process so as smoothly as possible.
- Try to label your fields the same thing as the column names in your CSV files. This will speed up the Node Import configuration.
- When importing data that you're going to want to set up as multi-select (either with a select list, a series of checkboxes, or some other widget) be sure allow more than one value for the field its CCK configuration page.
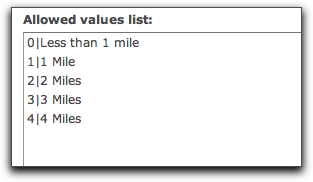
- When setting up any fields that use selects, radio buttons, or checkboxes, make sure that you include ALL the possible values from your CSV data as allowed values in the field's "Allowed values list" in its CCK configuration page.
- Remember the "Closest Parking Area" data column - its data was all integers that refered to the distance to the climbing area from the parking area. For this type of field, you'll want to set up your CCK field to store the column value, but display some more "friendly" text:
- When setting up the node reference field, you'll probably want to make it a "Required" field and limit it to the particular content type you're importing. Also, in this example, since our "routes" CSV has the actual "Area Name", be sure to choose the "Select list" widget.
Configuring the Import
So far you have your CSV files ready to go and your content types ready for data. It's time to do the actual import!
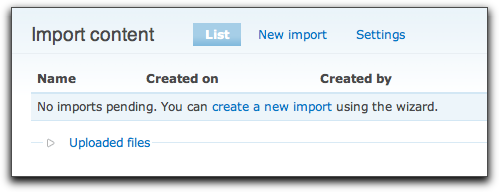
Since the Drupal 6 version of the module is a "work in progress", you're going to want to use the latest development release (I used 6.x-1.x-dev from 2009-Apr-22). This is because the latest release candidate (6.x-1.0-rc4) has some bugs in it that you'll want to avoid. Once you download and enable the module, click on over to "Administer|Content Management|Import Content" (admin/content/node_import) and click to create a new import.
The node import process is divided up into several step - the first step is purely informational, but it is important to note that you're not going to want to use your browser's back/forward buttons in the middle of the process. Be sure to use the "Back" and "Next" buttons or things will go all pear-shaped (perhaps my favorite British expression).
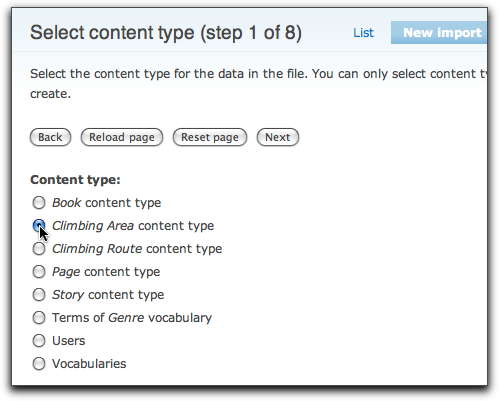
The first "real" decision you'll have to make is which content type you want to import content to. When dealing with related data being imported, you'll always want to import the "base" data first. In your case, this is the "climbing areas" content. This is important since the "climbing routes" content refers to the "climbing areas" content. If we did it the other way around, there would be nothing for the "climbing routes" content to refer as they're imported. That would be bad. So, go ahead and select "Climbing area content type" and then proceed.
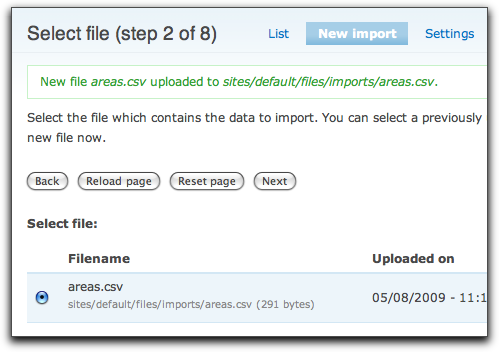
Next up, you'll need to upload the "areas.csv" data file (available for download at the end of this article). Each time you perform an import, the data file gets saved in your /files/imports/ directory. Then, in subsequent visits to this page, you'll see a list of previously imported files.
The next step sets the file options. Since your file is a pretty standard CSV file, nothing need to be changed on this step. Just make sure your settings look like this:
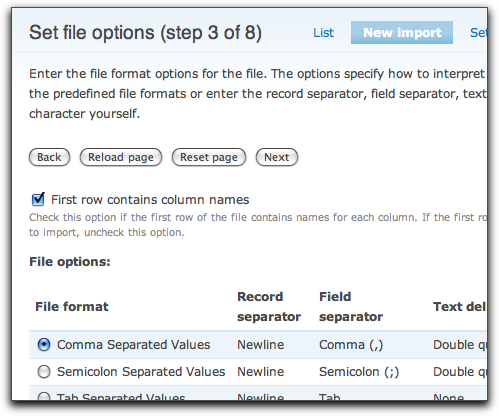
Towards the bottom of the page, the module shows you a few lines of your data file to ensure things are going well.
Step 4, "Mapping File Columns" is where things start to get interesting. This is where you map your CSV data columns to the CCK columns for the content type you selected in the first step of the import process. Remember when I said that it's a good idea to label your CCK fields the same as your CSV column names? If you've done that, then most of this step is already done for you. If not, you'll need to manually select the correct CSV column.
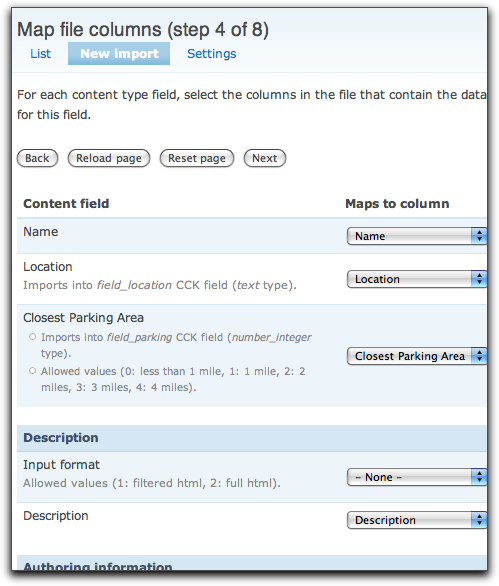
For CCK fields that are textareas, you'll also have the option to import the "input format". Since your data file doesn't have that information (most won't), leave it set to "- None -". The same is true of "Authoring information", "Publishing options", and some other settings. It's okay to leave them all set to "- None -" unless you have specific columns for them in your CSV data file. Go ahead and click "Next" once you're satisfied.
Depending on what kind of data you're importing, Step 5 sometimes have some additional options for you to set. In this case, we're good to go on to Step 6.
This step is all about default values. It is on this page where you can set default values for all those "- None -" fields from Step 4. The module does a pretty good job at guessing at the values for the default values (would that be default values for the default values?) so feel free to peruse and change them if you so desire.
Step 7 is where it all comes together - the module gives you a chance to preview some of the data as it will appear after it is imported. With any import, it is important to carefully review the sample data to make sure all your data is imported correctly. It is especially critical to make sure any non-text box widget fields (select lists, checkboxes, etc...) have their correct values set.
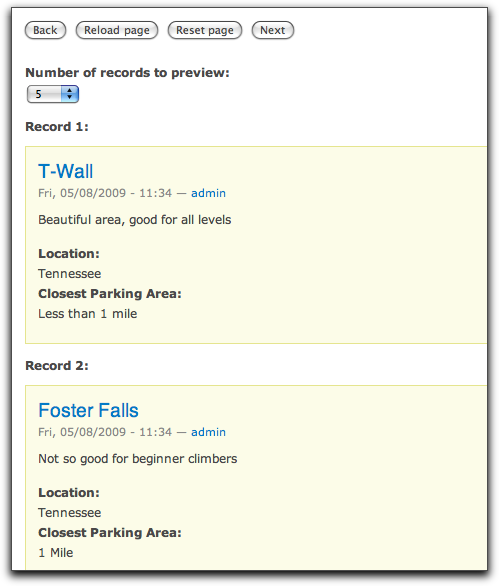
In this example, check out the "Closest Parking Area" field. If you recall, the data we imported was just an integer, but in the preview you can see the values are set to the correct values that you entered in the CCK field configuration page. Sweet.
Since everything looks good, click the "Next" button for the apex of the process. On Step 8, the final step, the module give you a chance to name your import (I usually append the default with "try 1", "try 2", try 3", etc... until I get it right). This page provides a quick summary of what is about to happen along with some of the settings that will be used. When you are satisfied, click the "Start import" and be amazed what you've done.
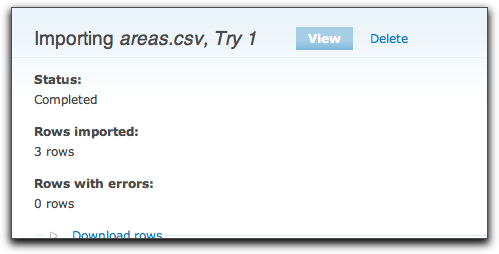
Congratulations! You've imported all 3 rows from the areas.csv file - go ahead and check them out via the admin/content/node page - you'll see that they're fully functioning Drupal nodes.
You're not done yet, though - you still need to import the climbing routes. The process is almost identical to the climbing areas import, with the following exceptions:
- Choose the "Climbing Route" content type
- Upload the "routes.csv" file
- No changes
- For the "Climbing Area" content field, select the "Area Name" column. This is where the node reference magic happens! Everything else should be good to go.
- For the "routes.csv" file, remember that we have a field, "Suitable For" that allows multiple values. This step just confirms that multiple values in the CSV are separated by the double-pipe in the data column.
- No changes
- Check out how in the preview, the "Climbing Area" data is actually already linked to the existing nodes we imported from the areas.csv file. Wow!
- No changes
After you run the import, you're done. You've successfully imported related content into Drupal and kept the relations intact. Go grab yourself a beverage of your choice, you deserve it.
Output
Just as with any other node with a node reference field, a "Climbing Route" node displays not only its data, but also a link to the "Climbing Area" node that it refers to:
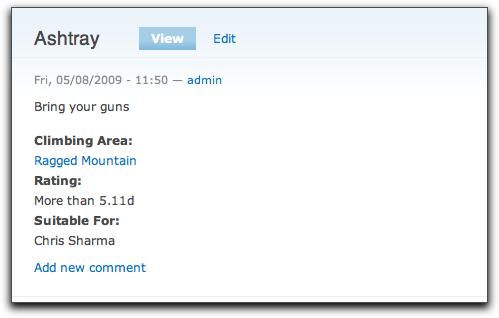
This relationship between content types can then be exploited using the usual methods - usually using the Views module.
Wrap-up
While this was a fairly simple example with limited data, it is important to note that the process would be exactly the same if we had 10,000 areas and 30,000 routes (it uses Drupal's BatchAPI to allow for really big data sets while keeping the user appraised of its progress). This is an extremely powerful module that definitely has a purpose in the Drupal eco-system.
The Node Import module imports a bunch more field types that what I covered in this article, including user references, images, dates, and Location module data. It can also even import users as well as taxonomy vocabularies and terms.
Check it out and let us know what you've imported in the comments!
Comments
A big thank you for writing
A big thank you for writing up this tutorial. I needed to import from another database a set a spare parts grouped according to models. I thought I was going to have to do some major programming to get this done. However, your tutorial was exactly the process I needed to get the job done. After some careful manipulation of the data in a spreadsheet I was able to get the data into a .csv file and then imported into Drupal.
You tutorial is well explained and an easy read. Thanks.
Thanks DrupalEasy.com for a
Thanks DrupalEasy.com for a thoroughly complete and useful tutorial.
Very interesting article that
Very interesting article that is relevant to the website I am currently working on - Wish that I understood it!
Worked great Mike! Thanks
Worked great Mike! Thanks alot. One issue I have to remember is that a lot of the artist data is redundant so I can easily go into microsoft excel and filter out the redundant artists to get unique data.
I wonder if the node import module can handle csv files with close to 5400 song records and several hundred artist and album records
Great tutorial! Very clear. I
Great tutorial! Very clear. I was just sitting down to do this same thing ... I knew it was possible and I was going to figure it out eventually, but your tutorial saved me some time! Thanks!