This article is also available in French.
Displaying hierarchical content is a common request of database-driven web sites. Drupal gives you great flexibility in doing this without writing a single line of code, using a couple of battle-tested modules. As an example, let's say you're building an automotive web site. Your site is going to have a list of automotive brands and the vehicles they build. You'd like to only have to enter each brand's information into the database once, then simply refer to that brand whenever you add one of their vehicles to the site. In this example, I have 2 brands, Chevy and Jeep, and each brand has 3 vehicles.

Drupal's powerful CCK module allows you to define different content types for your web site. The Node Reference module, included with the rest of CCK, allows you to set up hierarchical relationships between content types.
I went ahead and set up 2 simple content types:
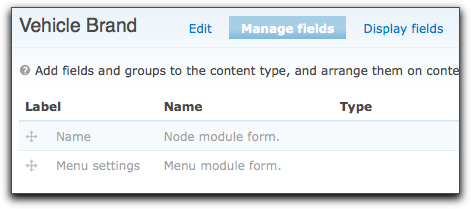
The "vehicle brand" content type is just a simple content type with the body field removed and no additional fields added. The user just needs to enter in the brand's name.
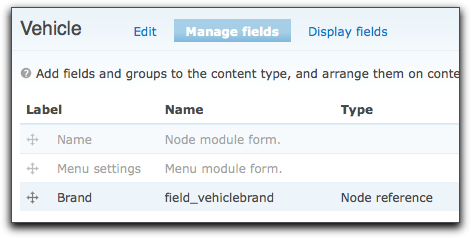
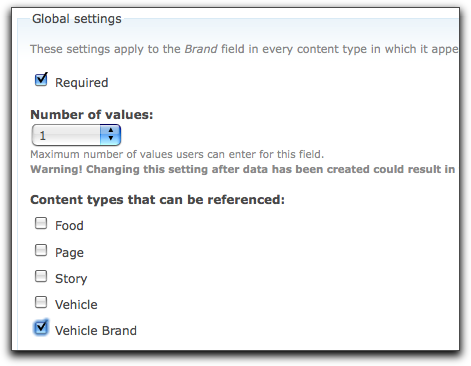
The vehicle content type is similar to the vehicle brand content type in that there is no body field, but I did add a Node Reference field that allows the user to select the brand that the vehicle belongs to. I set it up as a select list with the following settings:
Once the content types are set up, you need to input some sample data. In my case, I entered the brands and vehicles as shown above.
The trick now is to figure out how to display the brands and vehicles in a hierarchical list of links that will bring us to each of the nodes that we just created. This can be accomplished using Views Relationships.
I went ahead and set up a basic node view named "vehicles", with some basic settings:
Row Style: Fields
Fields: Node Title (no label, linked to its node)
Sort Criteria: Node: Title (ascending)
Filters: Node: Type = Vehicle, Node: Published = Yes
These simple settings will get us an alphabetical list of all vehicles. This is a good start, and you'll be able to build on this to get what you want. To achieve this, you need to add the relationship between the vehicles and the brands:
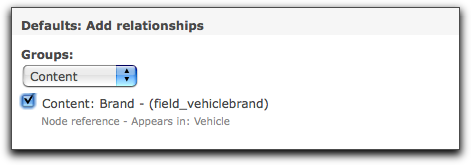
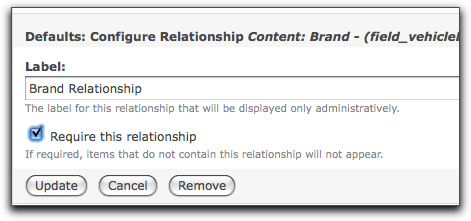
In our simple example, there is only a single "content" relationship available, the node reference relationship we set up earlier. Be sure to require the relationship and name it "Brand Relationship" on the settings page after you select it.
Now, you're going to want to add the Brand's name as a field so that it can be used to group the vehicles in the output. The important bit here is that we want to select the "title" field for the "vehicle brand" and not the "Content: Brand" node reference field for the "vehicle" - a subtle but important distinction. When selecting the "Node: Title" field, you'll have the option to use a relationship - you'll need to use the "Brand Relationship". You'll also want to change the label (for now) to "Brand" and check the "Exclude from display" and "Link this field to its node" checkboxes.
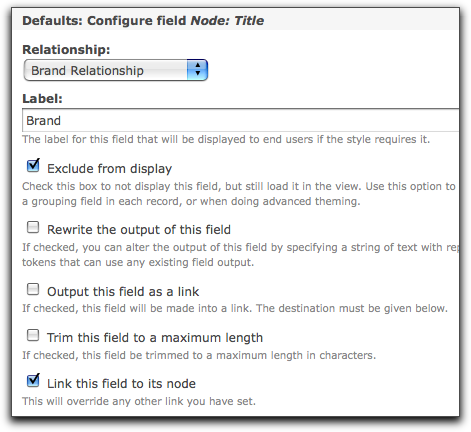
The "Exclude from display" option pulls in the brand titles, but doesn't display them - this will be handled by the grouping that you set up in a minute.
At this point you should see the alphabetical list of vehicles with no brand information visible.
In order to view the data as a hierarchy (and see the brands), we need to group the fields by the brand name. Do this by clicking the settings button for the "Style" in the "Basic Settings" section.
![]()
Select the "Brand" as the field to group by. If we hadn't changed the label of the brand's "Title" earlier, then we'd have to choose between two options that are both named "Node: Title" - the vehicle title and the brand title. That's confusing.
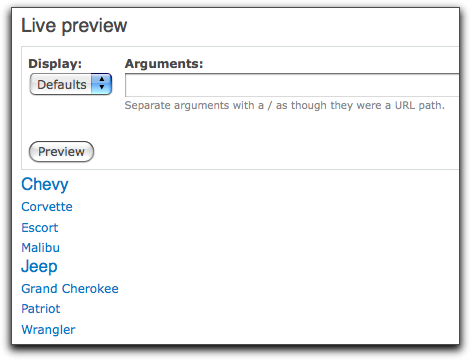
That's it, you're done! Take a look at the view's preview and you'll see the desired results. Feel free to go back into the "Node: Title" for the brand and remove the "Brand" label (remember, it was only there to help us choose the correct grouping field) - doing this leads to the view result looking like:
It is important to note that it is also possible to do all this by setting up the vehicle brands as a taxonomy, and not a separate content type. It makes sense to use taxonomy if you aren't going to need to fully describe the vehicle brands. In this example, it is assumed that the vehicle brand content type is going to have additional fields describing the brand (Nationality, HQ location, number of employees, logo, etc...)
There are a lot of ways to further customize the look of the resulting hierarchy with theming, but this should get you moving in right direction.
UPDATE: I went ahead and exported the 2 content types and the view and provided below for you to download and import.
Comments
FYI the link to CCK is
FYI the link to CCK is faulty, it shows as a broken image link.
Thanks Damien - you're the
Thanks Damien - you're the man - much appreciated.
-mike
That's great! Better that
That's great! Better that taxonomy using! But I have a problem.... I've done all theese steps and I have "Display 'Defaults' uses fields but there are none defined for it or all are excluded" =( What should I do?
Alex, It sounds like you
Alex,
It sounds like you skipped a couple of steps in the tutorial...
I just added the content types and view exports to the tutorial - grab them and import them to see what you missed.
Thanks,
-mike
Great tutorial, thanks! How
Great tutorial, thanks!
How would you set the "brand" links to go to pages that contain both the node content for that brand, plus an "attached" view of the vehicles associated with it?
Dan, You'd have to create a
Dan,
You'd have to create a new view that displays the current brand node info and use a Views display attachment that shows the vehicles associated with it (pretty much just like you said).
The tricky part is that you'll need to use the "Rewrite the output of this field" option for the brand title to create a link to the new view instead of the default node display for the brand.
-mike
This post is very interesting
This post is very interesting in dealing with managing hierarchical data, but two things were left out which would complete the big picture.
Managing Hierarchical content involves 3 things:
1. Displaying content hierarchically (which you covered)
2. Easily entering the hierarchical content into the database - how would you create a vehicle as your entering a vehicle brand in the admin?
3. Handling Deletes - how can you easily delete all vehicles when a vehicle brand is deleted?
Perhaps that could be two more articles to write?? Anyways, thanks for the write up.
chevy doesn't manufacture the
chevy doesn't manufacture the escort. That is a Ford model.
Heh - good call about the
Heh - good call about the Escort being a Ford product. My bad.
-mike
Thanks, Mike, I've done
Thanks, Mike, I've done everything! My problem was not technical, I understood some thing I wrote about wrong :) And I agree with Glenn Mc, this way of realization has big future, I'll have some ideas and I'll post here when I have smth new.
Thanks again, thanks from Russia =))
Alex.
hi this the situation I have
hi
this the situation I have [please click on the link - it is the printscreen]
http://www.freeimagehosting.net/image.php?6938a82673.jpg
its bit different because my view is a block and i am displaying it below the content
as you can see i am displaying 2 content types on one page but i want to specify the view in that way so the second one (lyrics) will only apperar on the specific pages
if someone added new song 'song 1' and that song belong to 'album 1' i want the lyrics to be display only on the 'album 1' page, not on every album pages
there must be a way :) please
doesn#t matter any more, i
doesn#t matter any more, i did it
Pingback
[...] climbing area. I'm going to assume that you know how to set up related content types - check out this article for some background if you're not [...]